Saturday 25 June 2011

The Domes.

Because at least half of my followers at this stage have requested it and I have been so slack in updating, I have decided to do a little on the domes that serve as mobile pens for the chickens in the mandala.


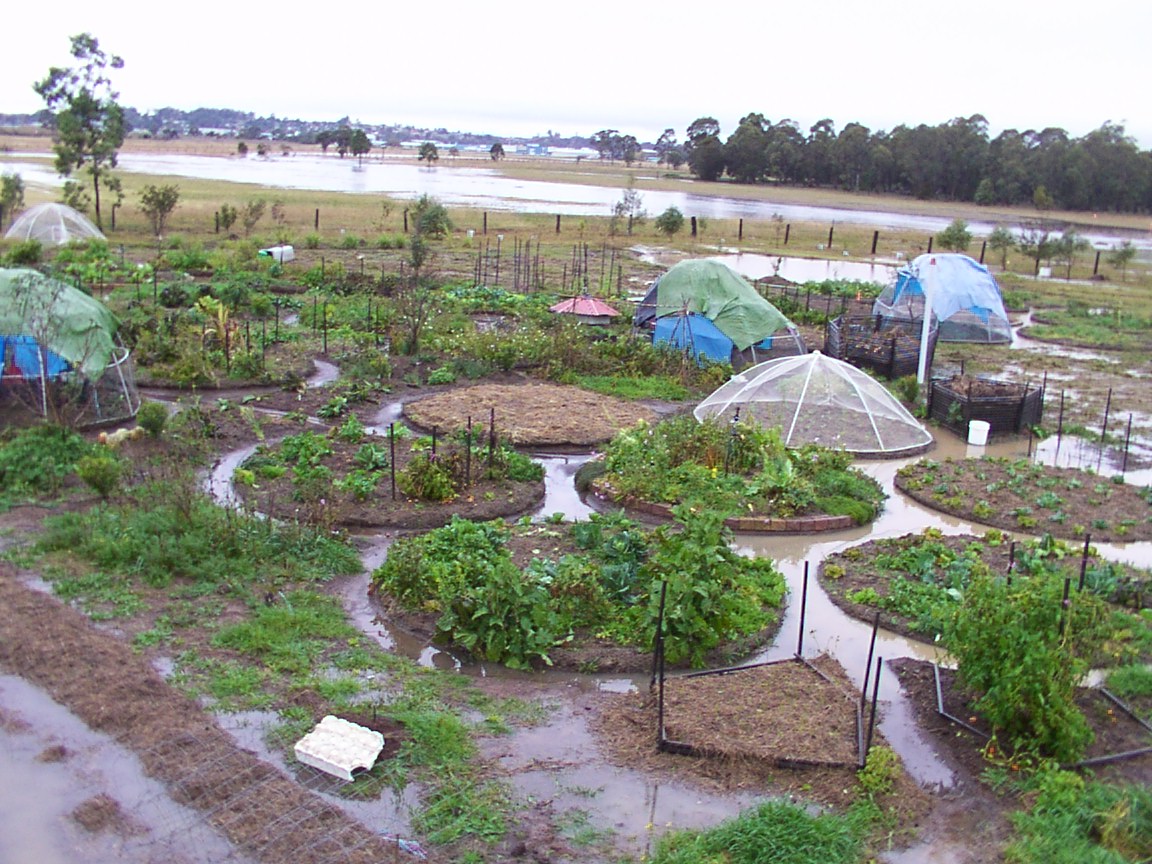
They are actually a lot more than pens as they provide for all the needs of the chickens while they are on the mandala beds. The cover over the domes provides their shelter and hides their roost where the chickens spend the night. We will talk more about the chickens and caring for them at another time.


In her book The Permaculture Home Garden, Linda Woodrow sets out a design for the domes, using six meter lengths of (I think) 20 mm high pressure PVC pipe. I have used electrical conduit at 4 meter lengths, as it is more available and cheaper but the domes do suffer from the lessened strength of the conduit. We have overcome this shortfall as I will explain later, but this too comes at a cost in extra materials. Conclusion? Draw your own! But wait till the end of the page.

Feeder. waterer and nest box ( grass catcher).


The base of the dome is approximately four meters in diameter. Pi x diameter = 3.141 x 4 = 12.564. We have used three 4 meter lengths to make the circumference of the bottom circle 12 meters - which is what you get using two x 6 meter lengths too.

The circumference of the other two circles according to Linda's book are 10.6 and 7.4 meters although I have found that the "step -in" can be quite high if you are a short person and adjustment need to be made to the circumference to fit it closer to or further from the ground level on the finished product.

Installing the roost.


The arches are made from one and a half  lengths of conduit to make a six meter length. These join in their middle at the top of the dome and the ends are attached to the base and two other circles equidistant.

I originally attached the tubes using 5/32 screws and nuts but have found that fencing wire lasts much longer and works well. I also notched the circles were they met with the arches and glued them for added strength but found the weakening of the tube was not worth the extra strength of the joint.


Cheap wire netting is best as it is more flexible and lighter. Have as few joins as possible as they seem to damage the tarp cover with sharp edges. I have found that starting along an arch and doing each side with pleating more than cutting and joining, works best.

We used cheap poly tarps from the "chinese" hardware shop for a while but they broke up and we had pieces of blue tarp all over the garden after a wind. We went to a better quality and more expensive tarp and they seem much better value in the long run and much kinder to the environment.

These we tied to the embedded wore as shown previously though as the wire has started to rot at ground level we are looking at other ways and pegging is now necessary.

The failure in the design comes in windy areas as the strength of the dome is tested by a strong sideways beeeze. This can cause the dome to collapse on itself and break the conduit.


I have overcome this by fitting a solid roost made with 25 x 10 mm pine and fitting a prop under this roost to give extra strength in strong winds. The prop stops the sides from collapsing inwards and avoids damage to the dome.


This has been very effective although after six years and because of damage before the modifications, the domes are now ready for replacement. I have started work on some geodesic domes to replace not only the chook pens but also serve as poly domes for extending the season into the colder months of the year.


But that will be subject to another post when I have worked it all out.

Wednesday 15 June 2011

The centre bed.


Did I say "subject to inundation"? 
An old photo shows similar to today  but the trees at the back are much bigger.

Onion beds poking out from the water.

It is easy to see the need for raised beds - yes?


But now the the subject - the centre circle which I have shown a picture of before, has an ecosystem built into it to support the life needs of beneficial preditors of pests that may impact on food production.
We do this firstly with a pond that provides a source of water for insects and birds as well as modifying the microclimate with temperature stabilization and humidity. The birds and insects are attracted to the area to get a drink and will often leave the fruit trees alone as all they really want is a drink. While they get their drink we provide grass for seeds and fruits and flowers too as a source of food to complement the bugs or pests they consume while there.
Grass seeds, solar lights, sunning spots and even strawberries
for the bluetounge lizards who do not just like snails.


The places for lizards to sun themselves is important as is the places to hide and the sources of food that make this a place to live for the benificials.

Frogs that live in and around the pond advance into the surrounding beds, mainly at night, to feed on bugs and the solar lights attract many into the target range for them.
The pond is full of water chestnuts
and the blocks make a great place for lizards.

Monday 13 June 2011

The layout.

I started by reading the book The Permaculture Home Garden by Linda Woodrow from cover to cover after suggesting it was not strictly permaculture to a class I was teaching at the Dungog Community Garden (no longer going). My thoughts, in hindsight, at the time thought that the concept was "too neat" and that permaculture was messy by definition. I came to realize that this was so wrong and it was the "harmonious interaction of elements" that made for good design and not messiness.

Having read the book from cover to cover, I decided that not only was it good design but that I wanted to build it. I started with a piece of A4 paper and a five cent piece and started to place things as I saw them. It may have been a good idea to revisit the book during this process but, as Linda suggests, the book is about spreading the idea and the interpretation is open for individual modification. So I just did it from memory and came up with a few variations form the original
the plan original  
.The plan continues to evolve as time goes on with paths all the way around the beds and compost heaps as we will discuss later.

I then set out the beds with marking paint, This must have looked strange from the air. I then set to make the beds by digging out the paths to allow for raising of the beds. This would not be necessary generally but we have placed the garden on marginal land with poor drainage and subject to inundation from time to time. The beds were kept to size by the use of a hoop which was to be the bottom of my first chook dome.
one of the first with hoop as guide to the size
We did one set of seven circles and planted a green manure before moving on to complete the next set of seven.
wire netting embedded to retain mulch and restrict foxes
Next we will look at other aspects of establishing the mandala garden.

Sunday 12 June 2011

Behind the Concept

Permaculture is design system. This separates it from the other agricultural pursuits I have embarked on as it looks at the relationship between elements while organic growing, to some extent, looks at the needs of individual elements (plants).
Permaculture became known to me through Bill Mollison on ABC TV and I worked on doing the Permaculture Design Course (PDC) as soon as I could.
In 1996 I took the time and the money that it takes to do this lifechanging course and it was the best spend I have ever made. The Design Manual is an incredible manual on the overalls principals of design and practical ideas for the application of those principles. The introduction is a great way to get started as is Ross Mars book but Rosemary Morrow An Earthusers Guide to Permaculture is one of the best starts you could have.

Working with nature and learning from the interaction of elements in nature as they coexist is the reason for the success of the concept.
The chickens in the domes are working with the annual beds to produce food free from the need for artificial fertalizers and pesticides and the fruit trees too produce food while providing shade in summer and (being deciduous) let light from the Sun into the garden in winter.

Saturday 11 June 2011

Purple Pear Organics

Purple Pear Organics
Our web site serves as a window to the activities on the Farm. We post the courses and events as well as Transition Town - Maitland stuff here.

The Concept

The concept for the mandala market garden came from reading a book The Permaculture Home Garden by Linda Woodrow.

The mandala concept came from the ancient Sanskrit word for circle and encompasses the circle of life and the planets and much more.The Tibetan monks do beautiful sand mandalas as a form of meditation and being in my garden is a meditative experience for me too.
This is part of the gardens we have built at Purple Pear Organics and I will show more in the weeks to come.